|
|
|
|
|
|
|
|
|
|
|
|
|
|
|
|
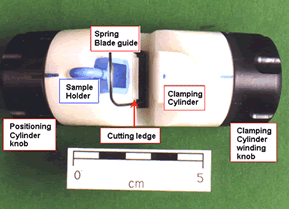
Webb Microtome
View of life-size Microtome from the top

Instruction headings: |
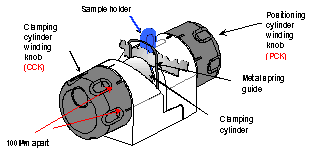
Side View of Microtome
|
1) to calibrate zero cutting position
-
For the right-handed operator, position sample holder on the left side.
-
Close the "jaws" of the microtome.
-
Retract the sample holder clear of the cutting gap by turning
the positioning cylinder winding knob (PCK) anticlockwise (i.e. Away from you). -
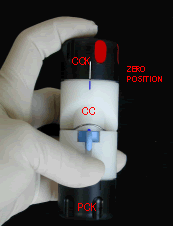
Turn the clamping cylinder winding knob (CCK) maximallly clockwise.
-
Reverse the winding until white marking aligns with the blue groove (see photo below).
Surface of clamping cylinder (CC) is now flush with the surface of the spring guide.
Calibration complete
2) To position the tissue
|
 |
This is the "zero" starting position
3) To set the section thickness
The black CC and PC winding knobs are marked by grooves spaced apart for 100 microns thickness.
Example: to set for cutting section of 100 micron thickness :
-
At zero position, from the white marking on the CCK, dial anticlockwise to the first groove on the CCK (this retraction of CC creates a cavity of 100 microns deep).
-
Then dial clockwise a distance of 100 microns with the PCK (this moves the tissue forward 100 microns into the space vacated by the cc).
The tissue is ready for cutting
4) To prepare the razor blades
!!!!!!!! CAUTION !!!!!!!!
-
It is advisable initially to use the finger guards for protection against accidental cuts but once the operator becomes proficient, surgical "rubber" gloves should be adequate to prevent any slippage of the blade.
-
For sections <100 microns thick, very little pressure is needed to push the blade through the tissue and rubber gloves may be preferable to finger guards, as sensitivity of fingertips is greater through the rubber glove.
-
For sections >100 microns thick of particularly unyielding tissue, it is advisable to wear the finger protectors provided.
 |
Snap
at both ends of the blade lengthwise |
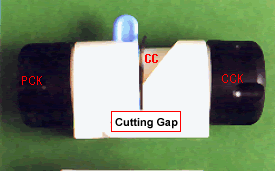
Microtome in cutting position:

5) To cut the section
-
Hold the cutting blade with thumb and middle/index finger.
-
Insert the blade into the cutting gap with the aid of the metal spring guide.
-
Use a delicate sawing action and with gentle pressure, move the blade through the tissue right to the base of the microtome.
-
When the cutting ledge is felt, finish the sectioning with a final sawing action.
6) To remove the section
-
Open the microtome and rest it on the support cube.
-
The section may be found attached on the blade or on the surface of the CC (generally thin sections adhere to the blade and thick sections to the cylinder surface).
The section can be removed by:
-
Fine forceps.
-
Fine paintbrush.
-
Using a micropipette to flush it onto a slide with soln. e.g. Medium/water/buffer.
7) To collect the section
The section can also be directly collected on a circular coverslip thus:
Adhere the coverslip (1.8cm diameter) onto the surface of the cc during zero calibration.
Allow for the thickness of the coverslip at the zero calibration.
(NB: White and blue markings will therefore
NOT align as described if coverslip used).
